Report Contents:
- Abstract
- Background
- Algorithm
- Experiments and Results
- Source Code
- References
Background
Teaching complex motor behavior to a robot can be
extremely tedious and time consuming. Often, a programmer
will have to spend days deciding on exact motor
control sequences for every joint in the robot for a gesture
that only lasts a few seconds. A much more intuitive approach
would be to teach a robot how to generate its own motor
commands for gestures by simply watching an instructor
perform the desired task. In other words, the robot should learn
to translate the perceived pose of its instructor into appropriate
motor commands for itself. This imitation learning paradigm is
intuitive because it is exactly how we humans learn to control
our bodies. Even at very young ages, we learn to control our
bodies and perform tasks by watching others perform those
tasks. But the first hurdle in this imitation learning task is
one of image processing. The challenge is to develop accurate
methods of extracting 3D human poses from monocular 2D
images.
Currently, the most common method for training robots
complex motions is to use a motion capture system. Here
at the UW Computer Science department, we have a full
motion capture rig which is capable of extracting the exact
locations of targets in a 3D environment. So to get a sequence
of 3-dimensional body poses, an instructor dawns a special
suit with targets on each of its joints, and then performs
the desired gesture while the motion capture system records.
This technique works quite well because there are sensors all
around the room, and thus accurate joint locations of the actor
can be extracted using triangulation techniques.
The biggest downside to using a motion capture rig is that
training can only be performed in a rigid (and expensive)
environment. Also, the motion capture system is unsatisfying
because it does not allow the robot to behave autonomously.
It is much more desirable for the robot to use its own vision
system to extract the 3D gesture of its instructor. This would
allow us to "close the loop" for the learning process. Using
only its own eyes, a robot should be able to watch an instructor,
convert what it sees into a 3D gesture, and then translate that
gesture into its own motor command sequences.
In an effort to improve on the motion capture method
described in the previous section, I have developed a new
system for detecting human poses using only a single camera
and a calibrated shirt and pants. The method uses a nonparametric
probabilistic frame work for localizing human body parts and
joints in 2D images, converting those joints into possible
3D locations, extracting the most likely 3D pose, and then
converting that pose into the equivalent motor commands for
our HOAP2 humanoid robot.
Algorithm
A step by step explanation of the pose estimation algorithm is shown below along
with videos to demonstrate the intermediary results of each stage of the processing.
Human Performs A Gesture:
Of course, the first step is for a human to perform the desired gesture while
wearing the colored shirt and pants. The robot watches the complete gesture and
saves the video sequence for analysis. Due to the limited distance between the stereo
vision system on the HOAP-2 robot, depth information is practically unusable. Thus, we are
essentially left with only a monocular video of the gesture.
|
Get the Flash Player to see this player.
Video showing an example of a gesture performed by a trainer.
|
Training for Color Classification:
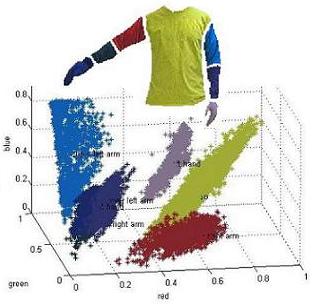
Next, the system needs to detect
where the different body parts are most likely located in each
frame of the video sequence. Since we have granted ourselves
the concession of using clothing with known colors, body part
detection is done by training a classifier in RGB color space.
Using a simple GUI, the user hand selects example regions
for each of the body parts. The RGB values of the pixels in
each region are then fit with Gaussian distributions and the
curve fit parameters are saved to a file.
|

Visualization of the RGB space for the body part pixel classifier.
|
Detecting Body Parts:
Once the colors have been learned for each body part, it
is relatively fast and easy to detect the probable body part
locations in any other frame from the sequence. For example,
Figure 3 shows the probability of each pixel being part of
the personís torso. Part location probability maps can thus
be generated for each body part in each frame of the video
sequence.
|
Get the Flash Player to see this player.
Video showing the results of body part detection using the RGB classifier.
|
Converting Body Parts into 2D Joint Location Probability Maps:
Once probability maps have been generated for
each body part, the system uses that information to generate
probability maps for each of the personís joints. For every
pair of body parts that are connected by a joint, the system
performs two steps to generate the joint location probability
map. First, each body part probability map is spatially blurred
with a Gaussian kernel. To speed up processing this blurring
is performed in the frequency domain using FFTs. Then, for
every pair of body parts that are connected by a joint, the
spatially blurred body part maps are multiplied together and
the resulting map is normalized so it is a valid probability
distribution function (PDF) for the current joint. The resulting
maps show the most likely locations for each of the instructors
joints in the current 2D video frame. An example of a 2D joint
location probability map is shown in figure 4.
|
Get the Flash Player to see this player.
Video showing the results of joint location estimation using the RGB classifier.
|
Sampling 2D Poses From The Joint Maps:
The next step
the system takes is to randomly sample N different 2D poses
from the joint location distributions. The sampling is done
with replacement using the PDF of each joint to control
the sampling. So that the poses that are generated are a
collection of the most likely possible poses. The number of
poses sampled is a user controlled variable and is currently set
to 100. Figure 6 shows an example of five 2D poses sampled
from the joint distributions.
|
Get the Flash Player to see this player.
Video showing N 2D poses sampled from the joint location estimation maps.
|
Converting 2D Poses into 3D Poses:
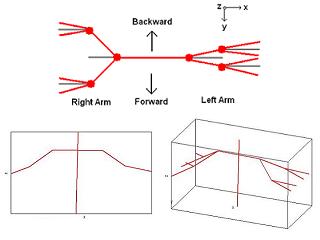
Converting the 2D poses
into 3D space requires that we exploit the approximate known
dimensions of the human body. In this system, all body part
lengths are measured with respect to the length of the torso.
This helps make the system more robust and allows the trainer
to be any distance from the camera. In our model of the human
body, the shoulder line is 0.6 times the length of the torso, the
upper arms are 0.4 times the length of the torso, and the lower
arms are 0.35 times the length of the torso.
Converting a given 2D pose into 3D is thus a matter of
figuring out how far forward or backwards each joint needs
to move in order to make each body part the correct length
in 3D space. For example, if the upper left arm is measured
to be length Dmeasured in the current 2D pose and the upper
left arm is supposed to be length Dtrue in 3D space, then the
left elbow could either be forward or backwards the distance
Doffset, where Doffset = Īsqrt(Dtrue^2 - Dmeasured^2).
|

Visualization of the conversion from a single 2D pose to all possible 3D poses.
|
Converting 3D Human Poses into Robot Angles:
Converting
each of the 3D poses into the corresponding angles for the
robot joints is performed using reverse kinematics. The robots
upper body has 8 degrees of freedom (ignoring the head and
the hands).
Starting with the upper left arm, the system detects the
amount of forward/backward rotation in degrees, saves that
angle, and then rotates all of the left arm joints about the
shoulder using the negative of the found angle. This procedure
is carried out for each of the degrees of freedom until all of
the joints have been rotated back to their initial state. Thus,
after finding all the angles required to get the 3D pose to its
zero state, we have all the motor commands the robot needs
to perform to get to the current 3D pose.
Throughout the process of converting each of the 3D poses
into robot angles, if an angle is detected that is beyond the
limits of the robotís abilities, then the system immediately
aborts the reverse kinematic process and that pose is removed
from the list of possible poses. This both saves processing time
and greatly reduces the number of 3D poses that are generated
for the given frame.
|
|
Viterbi Search To Choose Best Motor Commands:
After performing all the steps listed above, the system is inevitably
left with a fair number of possible poses it could send to the
robot. A forward Viterbi search is implemented to decide
which of the possible poses to send to the robot for each frame in the video.
|
|
Experiments and Results
A number of different gestures where tested using the method described above. Results
for these trials are shown in the videos below.
Source Code
References
-
- Y. D. Anthony Dearden,
"Learning forward models for robots,"
(2005).
-
- C. L. Baker, J. B. Tenenbaum, and R. R. Saxe,
"Bayesian models of human action understanding,"
(2005).
-
- D. Crandall, P. Felzenszwalb, and D. Huttenlocher,
"Spatial priors for part-based recognition using statistical models,"
(2005).
-
- P. Felzenszwalb and D. Huttenlocher,
"Efficient belief propagation for early vision,"
vol. 1, pp. 261-268, 2004.
-
- K. Grauman, G. Shakhnarovich, and T. Darrell,
"Inferring 3d structure with a statistical image-based shape model,"
October 2003.
-
- X. . D. P. H. Lan,
"Beyond trees: Common-factor models for 2d human pose recovery."
IEEE ICCV, 2005, pp. 470-477.
-
- X. Lan, S. Roth, D. Huttenlocher, and M. J. Black,
"Efficient belief propagation with learned higher-order markov random fields,"
(2006).
-
- G. Shakhnarovich, P. Viola, and T. Darrell,
"Fast pose estimation with parameter-sensitive hashing,"
2003. [Online]. Available: citeseer.ist.psu.edu/shakhnarovich03fast.html
|
|

